
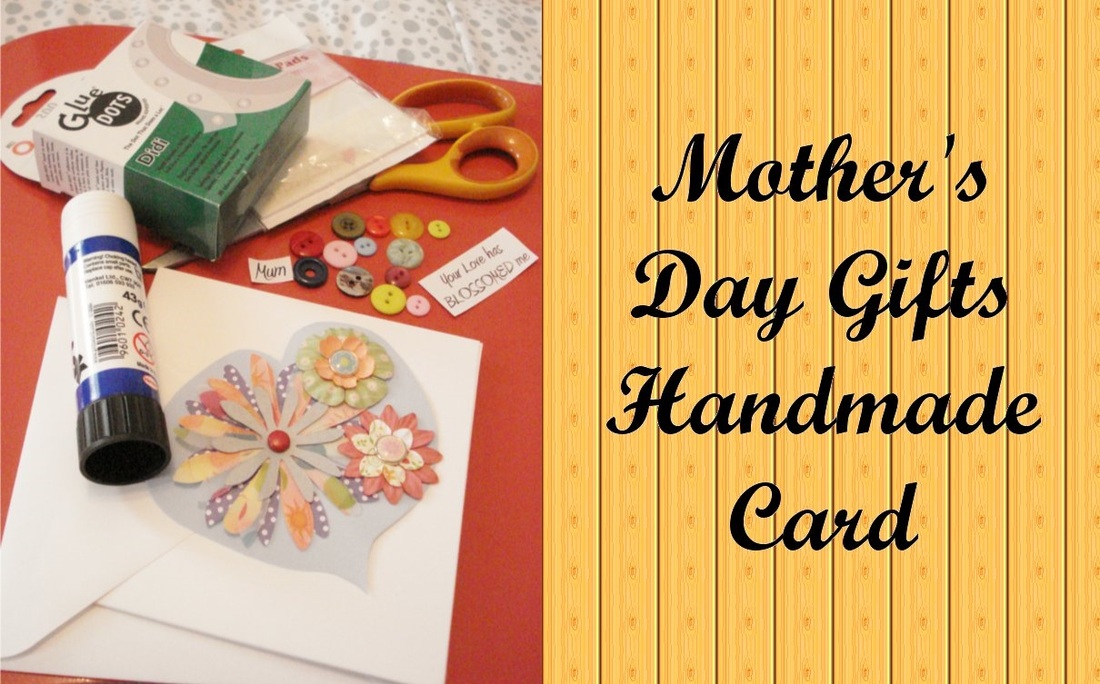
 Mother's Day is tomorrow! Eek! Of course I am forever the last minute queen so here's a quick last minute craft DIY for your lovely Mum.
You will need:
0 Comments
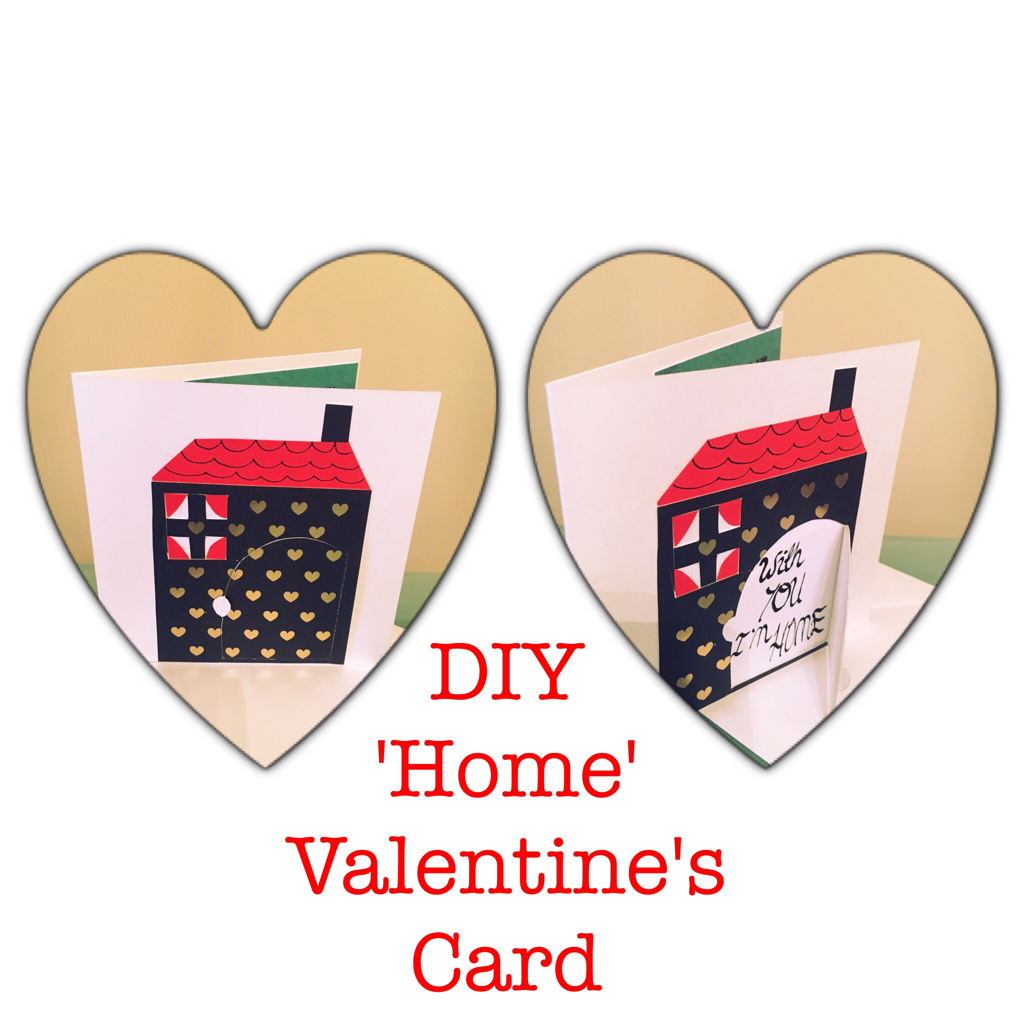 So here we are again, another year, another Valentine's. After being with my hubby for 7 years now (5 years of marriage) I find myself this year only looking forward to Vals because we'll get an excuse for some extra babysitting! Now we have a son and life has more responsibilities, it's not the great fluttery event it once used to be. All the more reason to use it for quality time whilst the 'rents look after the boy, hurrah!
Every year I find it harder to come up with a theme. I like to make my husband's card if I can. Previous themes have been 'you're my cup of tea', 'you have the key to my heart' and last year, quite aptly, I did a Superman card!  While Eli was back in hospital recently, yet again, for continuing poor weight gain over his reflux issues, I wrote this here blog to escape the tough trial we've been going through. He's been put on continuous feeding via a nasal gastric tube straight to his stomach. So far it's been doing the trick. Onwards and upwards! So what better way to take my mind off things than enjoying a bit of creative activity in the form of a handmade Christmas card. This one will be posted off to my lovely pen pal in the Netherlands, Petra. Very easy to do, here's the step by step. You Will Need: Decorative craft papers, Christmas theme of your choice. A square card blank. Some plain white card. Sharpie pens in colours of your choice to match your theme. Some organza ribbon. Glue, scissors, hole punch. Step 1 Cut out enough decorative craft paper to cover the whole background of your card blank and stick on. I'm using the purple holly paper that came free with the Christmas edition of Craftseller magazine. 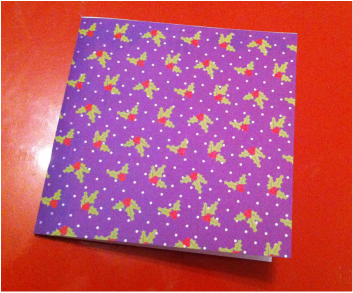 Step 2 Cut a circle free hand from your plain white card. Choose a Christmas sentiment to write and decorate. For mine I really love 'May the joy of the season last all year long'. Because Christmas often loses its true meaning of being about Jesus, I thought this one was quite a nice link to remember the joy. That lovely scripture from Nehemiah 8:10, 'the joy of the Lord is our strength'. And that we shouldn't just celebrate Jesus at Christmas, He is to be celebrated all year round. All the more this sentiment fits my feelings about the season. Using Sharpie pens, write the sentiment and decorate accordingly. Matching my holly background paper, I drew in some extra holly to decorate mine. 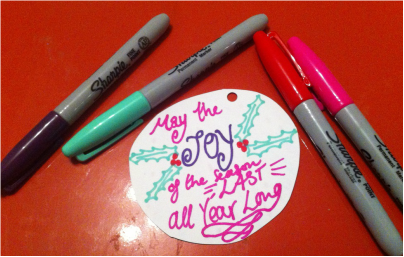 Step 3 If the person who receives this wishes to use the bauble to decorate their tree as intended, then you will need to decorate the back also so it doesn't look plain and dull on the other side. For mine, I did a very simple stripes and dots design. 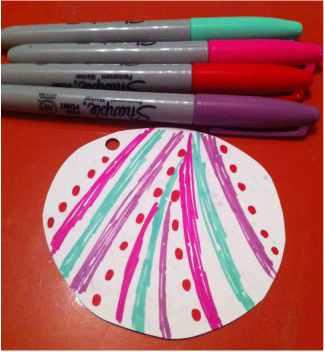 Step 4 Punch a hole in the top of your finished bauble. Thread some organza ribbon through and knot the ends together. 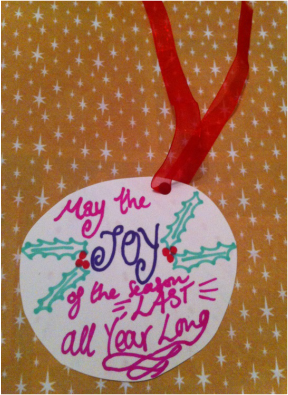 Step 5 Hang your bauble on the front of your card so the knotted end goes inside the card. Using glue dots, glue the ribbon to the inside. These are perfect for gently easing the ribbon off the card later on for the person who receives it. Finally, glue a sentiment to the inside. And the card is finished! 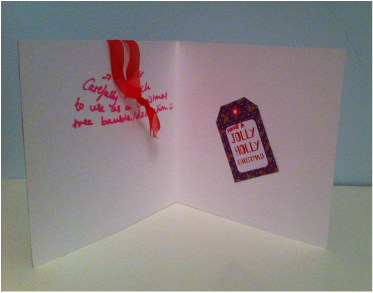 Here is the finished article. Feel free to get in touch with your own versions and I will be happy to post them up. Happy crafting. 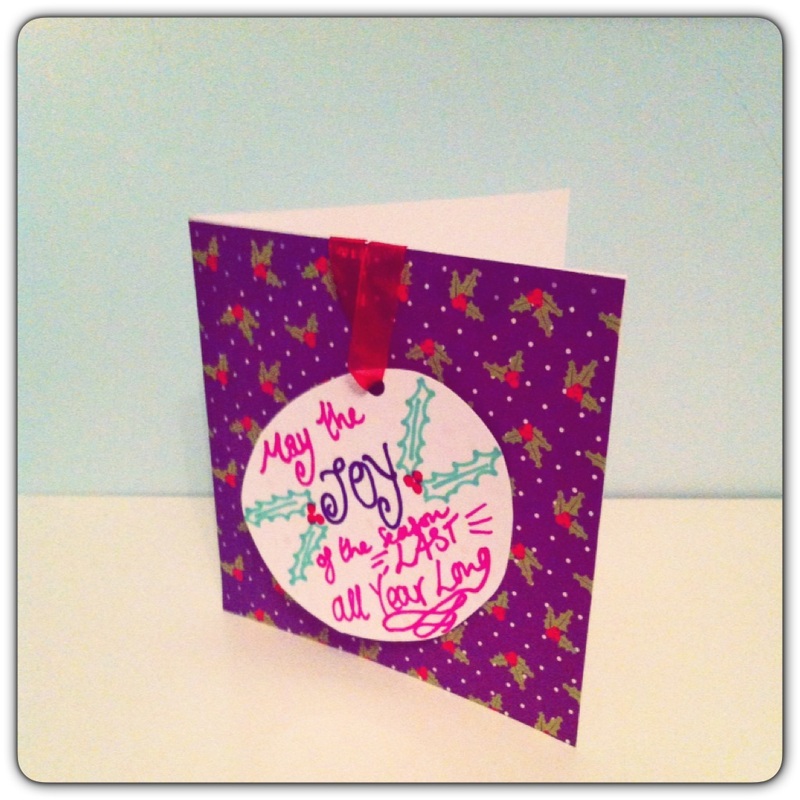 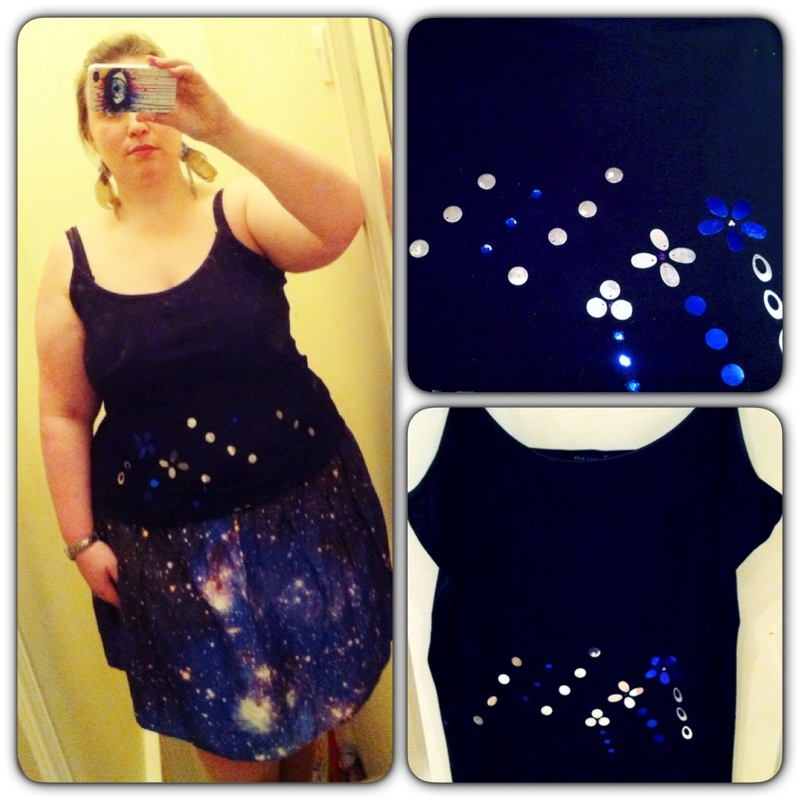 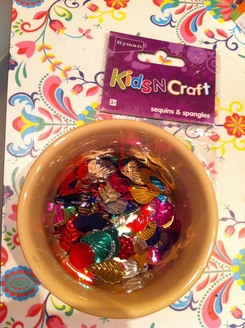 With only two weeks away until Christmas, the party season is upon us! I found myself thinking lately that I'd really like a new sequin top. To fulfil my need for something sparkly for all the social celebrations. But I didn't fancy the idea of spending out £20-£30 on a top I'll only wear once or twice for the month of December. So I had a creative idea to make my own! Now, sewing is not my forte, so of course I decided to just glue the sequins on. All you need for this is a fab versatile glue such as E6000. Apparently it is the 'jeweller's glue' and great for other projects too. Such as adding crystals to your Converse. I looked it up and it can withstand washing machine temperatures, so a 30 degree hand wash in the machine will do nicely! You can pick some up on Ebay ranging from a couple of quid for 3ml, right up to £5.99 for 110ml if you want to use it for future projects. If you want to be really thrifty, you could just 'upcycle' an old black tank top/strappy top. And customise to hide any markings. For me, under the arms get a bit grotty, so a sequin trim around that area is one idea. If you want to buy a new top, mine cost just £4.49 from New Look, which have their Inspire range for the bigger sizes too (perfect for me!). Lastly, you need your sequins. If you are a creative/crafty type like moi, then just hunt through your stash and I'm sure you will have something suitable. But if not, any craft store will do individual sequins to glue on which again should only be a couple of quid, if that. But if you want sequin trim which will make doing swirls or long lines much quicker, then I suggest you try a haberdashery. This was what I had to work with, 'kids' sequins! Had to really hunt out the suitable ones for my purpose! For your design, just look online for inspiration, Ebay search, Google image search etc. Find something you like and copy it to your specification. On initial research, I was aiming for a design that required sequin trim, such as, sequins already threaded. To allow for those spirals and lines I'd already mentioned. I got to the shops in Southend High Street just too late for our independent haberdashers 'Gades'. (It was shut by the time I made it there). Which would've stocked what I was looking for. So instead I ended up on a wild goose chase around any shop that sold craft items and came up with nothing! Hence, learn from my mistake, just head straight to the haberdashers and don't waste time otherwise! However, I ended up seeing these in The Range that I just couldn't resist... 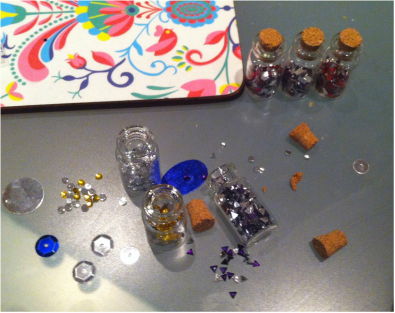 It was actually a set of 8 jars (2 are out of shot) and they only cost £1! You can see in the photo I broke a bit of cork in my haste to open them up! I love them, they make me think of treasure, precious gems and all the wonderful scriptures that go with that. (Spiritual treasure in clay jars, 2 Corinthians Chapter 4; We are a dearly held treasure, Deuteronomy). And they ended up coming in handy for some small subtle sparkles to finish off my top. And now for the step by step: You will need: E6000 glue, sequins of your choice, if you have them, 'Didi' glue dots, and a plain/basic black tank top/strappy top. 1. Try your top on and get a feel for where you want your design to go. Think about how it will flatter you or making sure you don't want to draw attention to any problem areas. (Being a woman of size this was an important factor for me!) 2. Once you have a rough idea, lay your top out and lay your sequins in the design you have planned and tweak it until you're happy. 3. Stick the sequins down with your glue dots. This will allow you to try your top on so they don't fall off, but also the glue is soft and tacky enough to be able to pull the sequins off and remove the glue dots to fasten them securely with your E6000 glue. 4. Try the top on and make sure the design is visible, doesn't draw attention to/covers areas you want to hide and just generally looks good. Tweak accordingly. 5. Once happy, keep them secured in place with the glue dots to keep your design in place so you don't forget what goes where. Take them off one by one, take the glue dots off and glue on with your E6000. Eh voila! 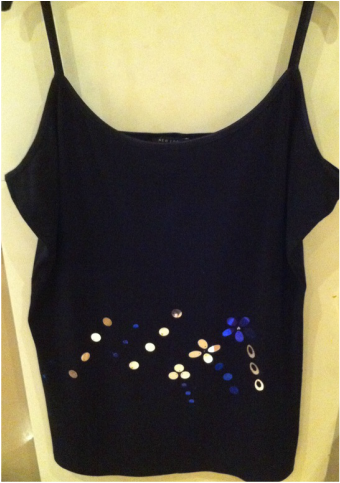 I made mine with the thought of it matching my 'space skirt', as seen in the header picture. So I picked out silver and electric blue to match. And if you fancy a space skirt of your own, mine came from 'Shadowplaynyc'. Which ties in nicely for a teaser of a future project. I just bought an astronomy magazine for the pictures to make some jewellery with... Watch this space!
 A little late in the day as by now I would assume most of you have visited your Mum today and given her her Mother's Day gifts and/or card. Apologies the schedule didn't go as planned this week but hey, what can I say, my little arrival (two weeks to go now!) is making me very tired! That's my excuse anyway! On with the show, today is the handmade card, the not so grand finale. As we go through, I will give you ideas on how to adapt this same design for a friend or loved one so if you wanted to try it out yourself, you still can. Equally, you can use exactly the same design for say your Mum's birthday, just change the sentiment on the inside accordingly. ('Giving thanks on your birthday' for example). Design copyright is all my own, Just Creative Julia 2014. I don't mind if you want to copy this card or the mug design as previously posted, to make for friends and family but please do not use for a commercial basis (in terms of using my designs for selling), thanks. Craft materials at the ready, here's your step by step. DIY Tutorial - Handmade Mother's Day Card
3. Draw your heart free hand on your blue stiff paper or cardstock. If this doesn't appeal, just do a Google search for a heart template in the right dimensions for your card and use accordingly. Cut the heart out. 4. I used brads with my paper blossoms and if using, simply attach them in the middle of each set of blossoms. I also used the brads to secure the blossoms to the heart. If not using, you can simply fix them with glue dots, Pritt Stick etc. Arrange and glue them on the heart for best fit and coverage. 5. In each corner of the card, glue a square sized piece of your floral patterned craft/background paper, so that you have a blank cross shape in the middle. It doesn't have to be accurate, mine isn't because I realised after I'd glued the heart down it needed a bit more! So had to carefully add my patterned paper under the already glued heart! 6. Arrange the heart onto the card, placing the sentiments as described but still don't glue them. Once satisfied with where your heart is going, glue to the card. Glue your buttons around the heart so that they overlap the outline onto the card blank. 7. Finally, glue the two sentiments, top and bottom using foam pads. 8. If you want to add a sentiment to the inside, simply print off and glue. I've used 'Giving thanks on Mother's Day' and printed off on the bright pink stiff paper to match the front. 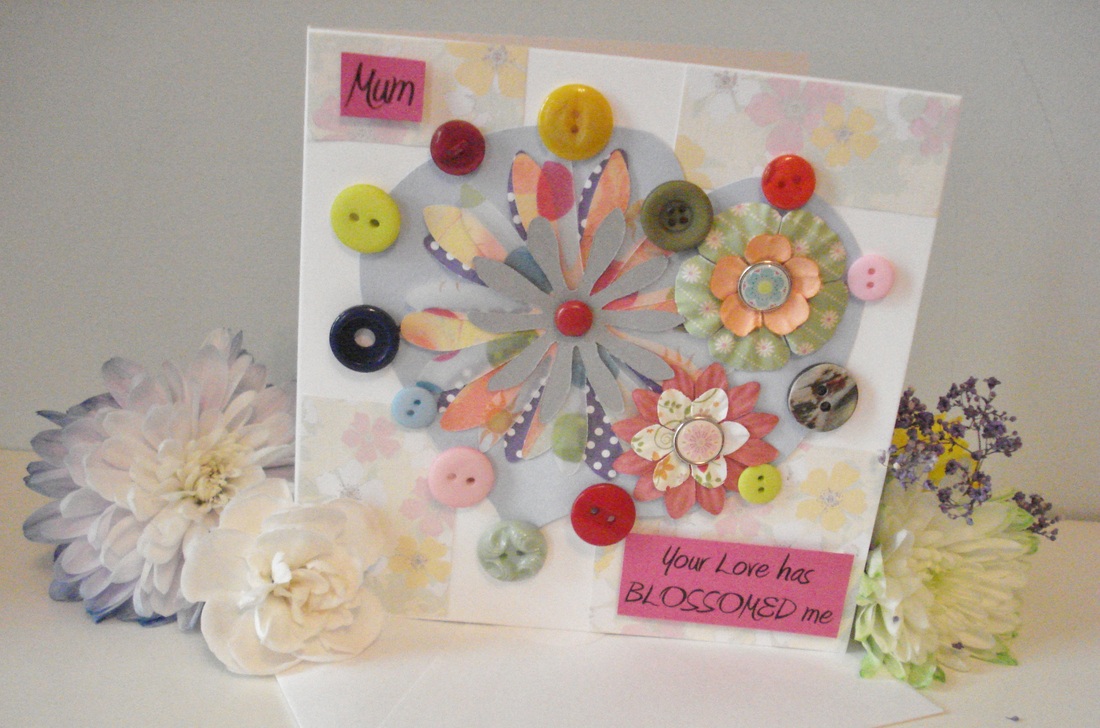 Here's my finished card. I've had some paper flowers in my craft stash I've been wanting to use for ages. I thought I'd finally use them for this project and the idea of flowers got my creative juices flowing for the sentiments. First of all I thought of 'Mum, you're BLOOMING marvellous, because...' and then the second one of 'Your Love has BLOSSOMED me'. On second thoughts, I thought two flower themed sentiments was a bit much and preferred the second one. You could just use the first one on its own also (without the 'because...'). The second one then gave me the idea to use the heart shape. Buttons are so popular at the moment and I love them too, so that was easy to use those to finish off as an outline. 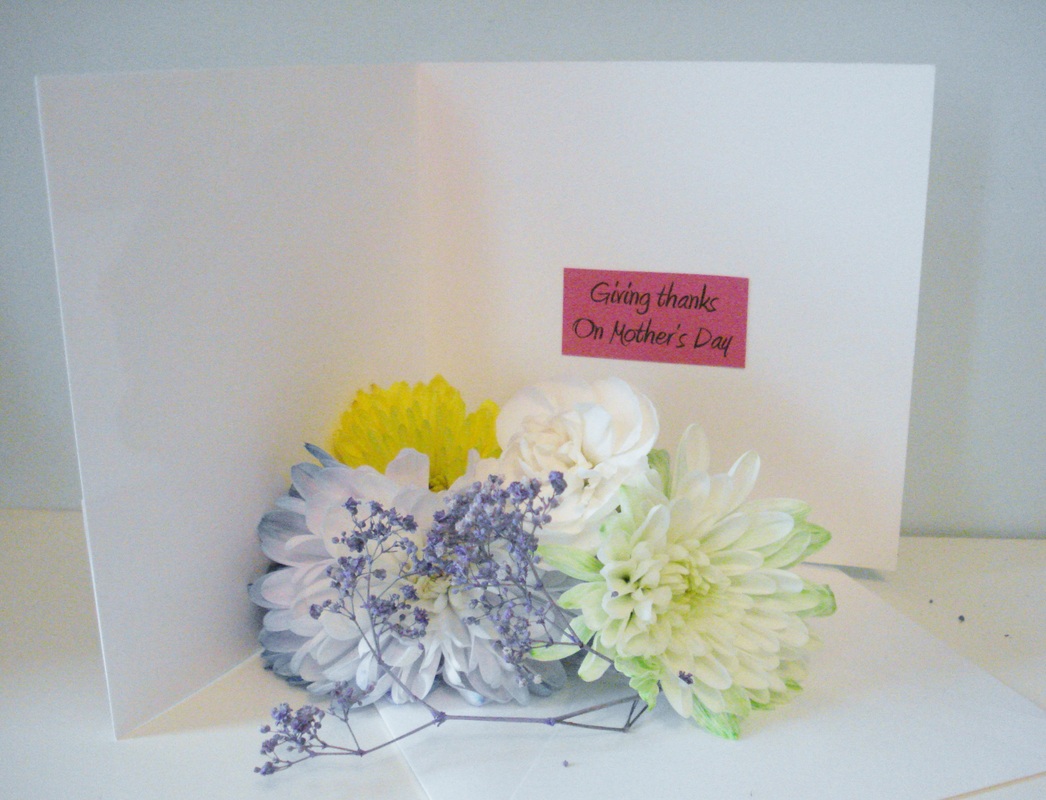 For the inside, originally I was just going to do a very simple 'Happy Mother's Day' for the sentiment. But today the sermon at Church was all about honouring each other. Even if you're not a Christian or follow a faith, this is such a great principle to live by. Anyone can be kind to others but truly honouring someone for who they are and accepting them, no matter what (so that means forgiving them too when they offend you or rub you up the wrong way!) just goes that little bit further. Hence I changed the sentiment to 'Giving thanks on Mother's Day' as it was so much more fitting with everything I heard today. Because, what is Mother's Day for if not honouring your Mum for who she is?Thanking them for what they do for you, that's a big part of it.
And to adapt the design, as already stated, you could still use the exact same design for your Mum for her birthday and just change the inside sentiment for your preference. For a friend, here's a few sentiments you could use that revolve around the flower theme: 'Friends are like flowers in the garden of life' 'Life is the flower for which love is the honey' 'A single rose can be my garden; A single friend my world' Instead of a heart shape, just use a circle or say, a diamond shape. Then add a 'Happy Birthday' sentiment inside or for whatever occasion it's for. Simples! That concludes the crafty makes for this week. I definitely gave myself a bit too much work, hence why the schedule didn't go as planned! As much as I've enjoyed it all, it's quite a relief to have finished it. Next week I will do more of a writing article. Enough craft stuff for now! Hope you enjoyed it too, please get in touch and show me your makes if you have a go yourself. Always nice to hear from you. 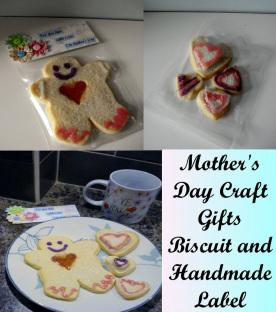
To continue the theme of all things Mother this week, today we will be looking at making a shortbread biscuit, in the shape of a gingerbread man. And a handmade label to accompany your packaging. If you went ahead with the decorated mug then the biscuit will be a perfect gift to compliment it. Why not pop round for afternoon tea on Mother's Day with your mug and biscuit ready to go! The Recipe
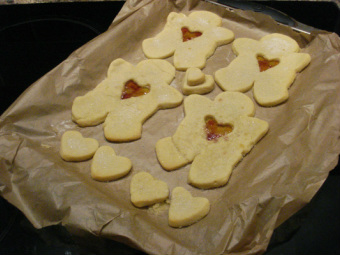
7. Place in the over for five minutes. Meanwhile, crush your sweets. I found the best method was to place 2 sweets at a time in a freezer bag or equivalent, then take out any pent up anger and bash away with a rolling pin! At first I tried to do about 6 at a time and it was quite tricky to crush them. Keep going 2 at a time, transferring to a small ramekin or dish, until you've crushed up about 6 sweets. I can't actually remember how many I did but if not enough you can always bash up some more! 8. When the 5 minutes is up, take out the oven and sprinkle the crushed sweets into the heart holes. At first I used my fingers and found this to be a bit messy with the sweets spilling out around the heart. Then I realised you could use a teaspoon for a much more accurate, targeted result! Repeat this process every five minutes with a total cooking time of 15 minutes. Before putting in for the final 5, sprinkle the biscuits with sugar. 9. Remove from the oven when nicely golden brown. Then leave to cool. 10. When cool, ice as desired. Such as a smiley face, an outline around the heart, lines on the hands and feet. Leave to set and once done, place in your cello bag and seal. I was a bit hasty getting mine in and so the icing smudged a bit! Ensure plenty of time to set and place in cello bag very carefully! 
Here is my finished article! Using my heart cutters and the extra dough, I cut out different sized hearts and layered on top of each other accordingly. You can just about see the packaging at the back of the photo. We shall be onto that for the DIY next. Handmade Label - DIY Tutorial
5. Stick your buttons in the middle of each paper flower then set aside. 6. Attach your label to your cello bag. I used staples and attached them at the end. I had great trouble with this! Trying to manoeuvre the stapler round to get it in the right place was a bit tricky at first! Ideally, I would suggest placing the staples horizontally at the bottom of the label. And don't leave it to the end like myself, then when you glue on your flowers and sentiments, you can cleverly hide them! I managed somehow to hide one under the flowers but the other stuck out and it looks so unsightly! 7. Step to your computer. For my sentiments, I've used three separate labels as follows: 'For You Mum'; 'With Love'; 'On Mother's Day'. My font was 'Amienne' and font size was 28. If you choose a different font, you may need a different size so do print out on paper first to test it to save your cardstock! 8. Arrange and fix your flowers and sentiments. I've placed my flowers on the left hand side, overlapping them so they stick out over the edge of the label. And the sentiments you can see I've arranged them in three lines, spreading out from left to right. 9. Eh voila! You have your finished biscuit packaging! 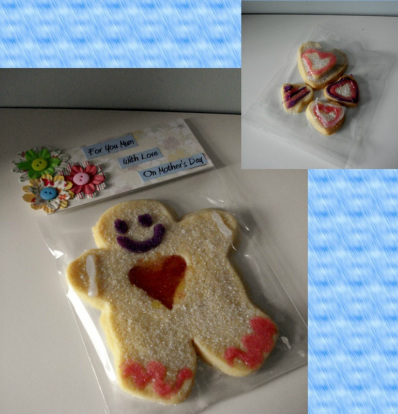
Here you can see the packaging just a little bit more closely. I iced the extra hearts and also placed these in a cello bag, as you can see top right.
And that concludes everything for today. I was hoping to post the handmade card tutorial for you later but I may just run out of time at this rate! I hope it won't be too late for you tomorrow instead. If it turns out you didn't have the time to make it for Mother's Day, feel free to use the same design but different sentiments for a friend's birthday or other occasion instead. Going with the flower theme, you could use a sentiment such as 'Friends are like flowers in the garden of life'. I hope you enjoyed that and as usual, feel free to get in touch. 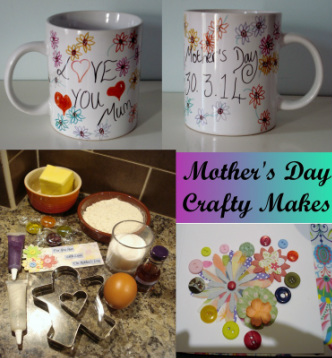 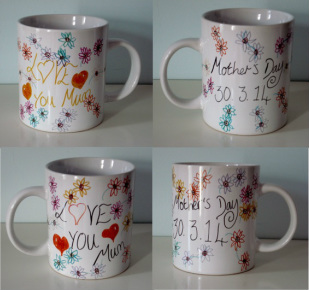 As promised, in this blog I will be sharing with you some hand made crafty gift ideas for Mother's Day. The initial ideas for the mugs and gingerbread man shaped biscuit have been taken from and adapted accordingly from 'Craft Beautiful' magazine, Issue 264, March 2014. However the actual mug and biscuit packaging designs are my own. The card and sentiments used are also my original design (all copyright of Just Creative Julia 2014 - to get the legal bit in there!). First up, for this part 1, the Sharpie painted mugs. Doing my research on ye old Google in terms of best practice for baking to get a really good dishwasher safe finish, I found a fab crafty blog, Craftaholics Anonymous, that gave a culmination of tried and tested tips. I've used this blog to gather my final instructions for baking. At the end of this post you will find the link for it if you want to check it out. This photo shows my first attempt where I wasn't aware of how the original colours actually changed after baking in the oven! The second attempt underneath shows my adapted design for the desired colours I wanted. For example, red turned orange, orange turned red, yellow turned brown, purple turned green/blue and vice versa! So do bear that in mind when doing yours, perhaps decorate a mug for yourself that doesn't matter so much if the colours come out different to first planned. Step By Step - DIY Painted Mug
Top tip: It seems the cheaper the mug, the better in terms of getting that dishwasher safe finish! Something to do with a cheaper mug having a cheaper glaze, therefore it makes it easier for the Sharpie pens to do their magic and really bake on without the interference of expensive glaze getting in the way! So weigh it up, does your Mum hate hand washing? Then you may need to sacrifice the bone china in order for the design to last that bit longer! Alternatively, if you know she wouldn't mind the hand wash, then by all means, go for a daintier, more expensive mug. Just warn her of such!
So that concludes part 1 of my Mother's Day crafty makes. I have a really busy week this week but I'm hoping/praying I'll have the energy to follow through and give you the other 2 parts before Sunday if you fancied having a go yourself. Part 2 will be the biscuit and part 3 the card to finish on. Watch this space! I welcome your comments as always, so feel free to get in touch. Blog credit: http://www.craftaholicsanonymous.net/21-tips-for-diy-sharpie-marker-mugs |

Hello there!I'm Julia, Just Creative Julia, jolly pleased to meet you! 
Welcome to my creative lifestyle blog, established 2014. My creative journey in discovering my authentic self as a neurodivergent woman.
Embracing the Neuro Spicy! Here you will find many different topics centring around creativity, deep thoughts, mental health, food and more. Archives
April 2023
Categories
All
|
 RSS Feed

