Just Creative Julia
  • Blog
  • Portfolio
    • Events
    • Writing
  • About Just Creative Julia
    • About Me
  • Links
  • Contact

Mother's Day Craft Makes - Part 1 Sharpie Mugs

25/3/2014

1 Comment

 
Picture
Picture
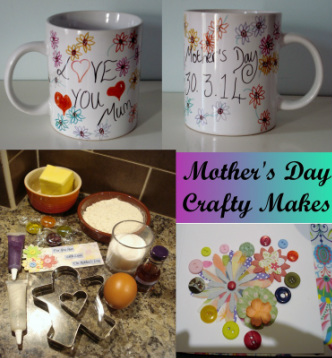
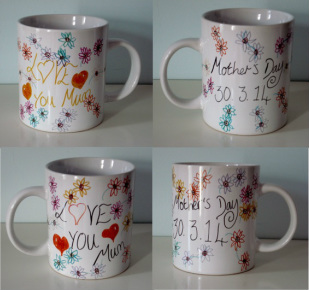
As promised, in this blog I will be sharing with you some hand made crafty gift ideas for Mother's Day.  The initial ideas for the mugs and gingerbread man shaped biscuit have been taken from and adapted accordingly from 'Craft Beautiful' magazine, Issue 264, March 2014.  However the actual mug and biscuit packaging designs are my own.  The card and sentiments used are also my original design (all copyright of Just Creative Julia 2014 - to get the legal bit in there!).

First up, for this part 1, the Sharpie painted mugs.  Doing my research on ye old Google in terms of best practice for baking to get a really good dishwasher safe finish, I found a fab crafty blog, Craftaholics Anonymous, that gave a culmination of tried and tested tips.  I've used this blog to gather my final instructions for baking.  At the end of this post you will find the link for it if you want to check it out.

This photo shows my first attempt where I wasn't aware of how the original colours actually changed after baking in the oven! The second attempt underneath shows my adapted design for the desired colours I wanted.  For example, red turned orange, orange turned red, yellow turned brown, purple turned green/blue and vice versa! So do bear that in mind when doing yours, perhaps decorate a mug for yourself that doesn't matter so much if the colours come out different to first planned.

Step By Step - DIY Painted Mug

1. Sketch out your design on paper first, planning your colours also.

2. Once satisfied with your chosen design, paint onto your plain white mug, being careful not to get fingerprints on the design.  As an extra precaution you can also wipe the mug down with nail varnish remover before painting, to remove any dirt or residue.

3. Leave to dry for at least 24 hours.

4. When ready for baking, place mug in a COLD oven, then set the temperature to 220 degrees C.  Set the timer for 30 minutes.

5. When the timer goes, turn the oven off and set timer again for 15 minutes, leaving the oven closed.

6. When the time is up, crack open the oven, leave the mug in there and let cool overnight.


You will need:
  • 1 x plain white mug - I bought mine from Argos, pack of 6 plain 'essential' mugs.
  • A pack of Sharpie pens - I bought mine from Rymans for £9.99 for a pack of 12 assorted colours.
  • Your oven for baking.
To copy my design, here's a step by step:

1. Do the writing element first on each side of the mug.  I've used 'Love You Mum' with two hearts on one side and 'Mother's Day' and the date on the other.

2. Starting from the centre near the words, draw swirly lines coming out and moving round the mug in a clockwise direction.

3. Then add the flowers to the swirly lines, using colours of your choice, simple!

Top tip: It seems the cheaper the mug, the better in terms of getting that dishwasher safe finish! Something to do with a cheaper mug having a cheaper glaze, therefore it makes it easier for the Sharpie pens to do their magic and really bake on without the interference of expensive glaze getting in the way! So weigh it up, does your Mum hate hand washing? Then you may need to sacrifice the bone china in order for the design to last that bit longer! Alternatively, if you know she wouldn't mind the hand wash, then by all means, go for a daintier, more expensive mug.  Just warn her of such!

So that concludes part 1 of my Mother's Day crafty makes.  I have a really busy week this week but I'm hoping/praying I'll have the energy to follow through and give you the other 2 parts before Sunday if you fancied having a go yourself.  Part 2 will be the biscuit and part 3 the card to finish on.  Watch this space! I welcome your comments as always, so feel free to get in touch.

Blog credit: http://www.craftaholicsanonymous.net/21-tips-for-diy-sharpie-marker-mugs

1 Comment
Leepae link
22/8/2023 02:26:04 am

Lovved reading this thanks

Reply


Leave a Reply.

    View my profile on LinkedIn

    Hello there!

    I'm Julia, Just Creative Julia, jolly pleased to meet you!

    Picture
    Welcome to my creative lifestyle blog, established 2014.  My creative journey in discovering my authentic self as a neurodivergent woman.
    Embracing the Neuro Spicy! Here you will find many different topics centring around creativity, deep thoughts, mental health, food and more. 

    Archives

    May 2024
    March 2024
    April 2023
    September 2021
    May 2021
    September 2020
    June 2020
    November 2019
    April 2019
    March 2019
    February 2019
    December 2018
    November 2018
    October 2018
    August 2018
    July 2018
    June 2018
    May 2018
    March 2018
    February 2018
    January 2018
    October 2017
    August 2017
    June 2017
    May 2017
    April 2017
    March 2017
    January 2017
    October 2016
    August 2016
    April 2016
    March 2016
    February 2016
    January 2016
    November 2015
    September 2015
    July 2015
    June 2015
    March 2015
    February 2015
    January 2015
    December 2014
    November 2014
    September 2014
    June 2014
    May 2014
    March 2014

    Categories

    All
    100 Happy Days
    Blogtacular
    Body Image
    Creative Community
    DIY Craft Tutorials
    Easter
    Faith Journey
    Fashion
    Father's Day
    Halloween/Autumn
    Ihanna’s Spring Swap DIY Art Postcards
    Interior Design
    Mental Health
    Mother's Day
    Music And Culture
    Parenting
    Poetry
    Ponderings
    Recipes
    Reflux Disease
    Valentine's Day

    RSS Feed

    Instagram
Powered by Create your own unique website with customizable templates.
  • Blog
  • Portfolio
    • Events
    • Writing
  • About Just Creative Julia
    • About Me
  • Links
  • Contact
Picture