Just Creative Julia
  • Blog
  • Portfolio
    • Events
    • Writing
  • About Just Creative Julia
    • About Me
  • Links
  • Contact

Mother's Day Gifts part 2 - biscuit and Handmade packaging

27/3/2014

0 Comments

 
Picture
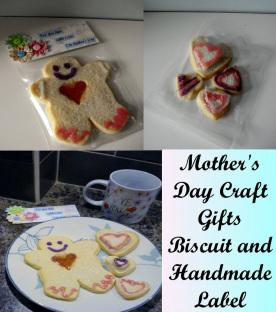
To continue the theme of all things Mother this week, today we will be looking at making a shortbread biscuit, in the shape of a gingerbread man.  And a handmade label to accompany your packaging.  If you went ahead with the decorated mug then the biscuit will be a perfect gift to compliment it.  Why not pop round for afternoon tea on Mother's Day with your mug and biscuit ready to go!

The Recipe

Baking Method

1. Pre-heat the oven to 180 degrees C (or 160 degrees for fan).

2. Mix together the butter and sugar until pale and smooth.

3. Add the vanilla extract and egg yolk and beat briefly.  Then gently incorporate the flour until completely mixed in.  Try not to overwork the mixture or the biscuits won't be so crumbly.

4. Using your hands, squeeze the mixture together into a ball of dough.

5. Cover the dough with cling film and place in the fridge to chill for at least 15 minutes, anything up to 45 if you have the time.  This will make it easier to work with when rolling out the dough.

6. Remove from the fridge.  Dust your surface with flour to prevent sticking and roll out the dough.  Cut out your gingerbread shapes.  Cut a heart from the centre of the body.  Try not to cut all the way through so you leave a thin layer of dough.  In my attempt I didn't do this and it was a nightmare removing the biscuits from my baking parchment! As the sticky sweets had stuck good and proper, causing my biscuits to completely fall apart whilst trying to remove the paper! I managed to get a couple in tact but it was very tricky! So do heed this advice! Lay out the men and hearts on your non-stick baking tray or parchment lined tray, if using.
Makes approx. 9 gingerbread shaped biscuits plus some left over for extra hearts.

You will need:
  • 230g unsalted butter, at room temperature, cut into small cubes.
  • 140g caster sugar, plus extra for sprinkling.
  • 2 tsp of vanilla extract.
  • 1 egg
  • 300g plain flour, plus extra for rolling your dough.
  • Boiled sweets.
  • Writing icing in colours of your choice.
  • Gingerbread man cutter or desired shape of your choice.  I bought a set of 3 from Ebay and used the medium cutter.  Dimensions approx. 12.5cm down and 10cm across at widest point.
  • Heart cutters, again I bought a pack of 3 from Ebay and used the medium one for cutting the heart from the body.  Dimensions approx. 3.5cm in diameter.
  • Cello bag - C6 size (fits an A6 size card, measures 12cm across by 16.2cm down).

Picture
My first attempt fresh from the oven! Was quite pleased with them if I do say so myself!

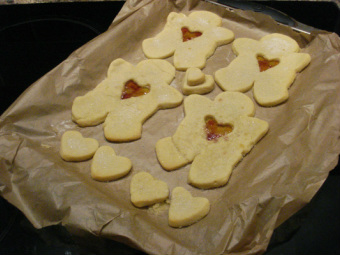
7. Place in the over for five minutes.  Meanwhile, crush your sweets.  I found the best method was to place 2 sweets at a time in a freezer bag or equivalent, then take out any pent up anger and bash away with a rolling pin! At first I tried to do about 6 at a time and it was quite tricky to crush them.  Keep going 2 at a time, transferring to a small ramekin or dish, until you've crushed up about 6 sweets.  I can't actually remember how many I did but if not enough you can always bash up some more!

8. When the 5 minutes is up, take out the oven and sprinkle the crushed sweets into the heart holes.  At first I used my fingers and found this to be a bit messy with the sweets spilling out around the heart.  Then I realised you could use a teaspoon for a much more accurate, targeted result! Repeat this process every five minutes with a total cooking time of 15 minutes.  Before putting in for the final 5, sprinkle the biscuits with sugar.

9. Remove from the oven when nicely golden brown.  Then leave to cool.

10. When cool, ice as desired.  Such as a smiley face, an outline around the heart, lines on the hands and feet.  Leave to set and once done, place in your cello bag and seal.  I was a bit hasty getting mine in and so the icing smudged a bit! Ensure plenty of time to set and place in cello bag very carefully!


Picture
Here is my finished article! Using my heart cutters and the extra dough, I cut out different sized hearts and layered on top of each other accordingly. You can just about see the packaging at the back of the photo.  We shall be onto that for the DIY next.

Handmade Label - DIY Tutorial

What to do:

1. Cut out a piece of cardstock (I've used white but you'll be covering the whole thing with patterned paper so use whatever is in your craft stash).  Measuring 11.5cm across and 10cm down.

2. Score across the middle and fold in half.

3. Cut out two pieces of your flowery patterned paper to cover the whole of the cardstock.   Stick on each side.  I did it in two to cover the front and back of your label, otherwise I could foresee it looking a bit messy if you tried to cover the whole thing then fold it!

4.  Choose your paper flowers and buttons to match your patterned paper accordingly.  For mine, I used six flowers altogether, using three flowers with two layers each in different sizes.  I just used Pritt Stick to secure together.
You will need:

  • Plain white cardstock.
  • Some pretty flower themed background craft paper.
  • Some paper flowers/blossoms to match your colour scheme.
  • 3 x buttons, again in colours of your choice.
  • Some coloured card to print your sentiments on.
  • Glues and fixings of your choice (I've used simple Pritt Stick for the main items and 'Didi' glue dots to fix the buttons).
  • Scissors or scalpel, metal ruler and protective mat, depending on how accurate you want to be!
  • Stapler and staples.
5. Stick your buttons in the middle of each paper flower then set aside. 

6. Attach your label to your cello bag. I used staples and attached
them at the end.  I had great trouble with this! Trying to manoeuvre the stapler round to get it in the right place was a bit tricky at first! Ideally, I would suggest placing the staples horizontally at the bottom of the label.  And don't leave it to the end like myself, then when you glue on your flowers and sentiments, you can cleverly hide them! I managed somehow to hide one under the flowers but the other stuck out and it looks so unsightly!


7. Step to your computer.  For my sentiments, I've used three separate labels as follows: 'For You Mum'; 'With Love'; 'On Mother's Day'. My font was 'Amienne' and font size was 28.  If you choose a different font, you may need a different size so do print out on paper first to test it to save your cardstock!

8. Arrange and fix your flowers and sentiments.  I've placed my flowers on the left hand side, overlapping them so they stick out over the edge of the label.  And the sentiments you can see I've arranged them in three lines, spreading out from left to right.

9. Eh voila! You have your finished biscuit packaging!


Picture
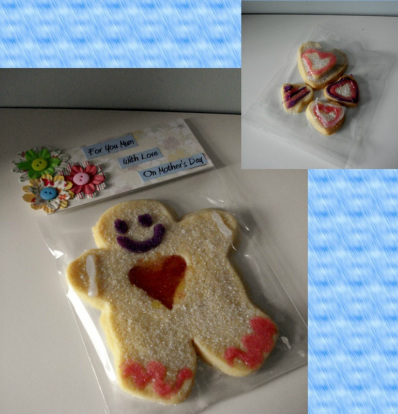
Here you can see the packaging just a little bit more closely.  I iced the extra hearts and also placed these in a cello bag, as you can see top right.

And that concludes everything for today.  I was hoping to post the handmade card tutorial for you later but I may just run out of time at this rate! I hope it won't be too late for you tomorrow instead.  If it turns out you didn't have the time to make it for Mother's Day, feel free to use the same design but different sentiments for a friend's birthday or other occasion instead.  Going with the flower theme, you could use a sentiment such as 'Friends are like flowers in the garden of life'.

I hope you enjoyed that and as usual, feel free to get in touch.

0 Comments


Leave a Reply.

    View my profile on LinkedIn

    Hello there!

    I'm Julia, Just Creative Julia, jolly pleased to meet you!

    Picture
    Welcome to my creative lifestyle blog, established 2014.  My creative journey in discovering my authentic self as a neurodivergent woman.
    Embracing the Neuro Spicy! Here you will find many different topics centring around creativity, deep thoughts, mental health, food and more. 

    Archives

    May 2024
    March 2024
    April 2023
    September 2021
    May 2021
    September 2020
    June 2020
    November 2019
    April 2019
    March 2019
    February 2019
    December 2018
    November 2018
    October 2018
    August 2018
    July 2018
    June 2018
    May 2018
    March 2018
    February 2018
    January 2018
    October 2017
    August 2017
    June 2017
    May 2017
    April 2017
    March 2017
    January 2017
    October 2016
    August 2016
    April 2016
    March 2016
    February 2016
    January 2016
    November 2015
    September 2015
    July 2015
    June 2015
    March 2015
    February 2015
    January 2015
    December 2014
    November 2014
    September 2014
    June 2014
    May 2014
    March 2014

    Categories

    All
    100 Happy Days
    Blogtacular
    Body Image
    Creative Community
    DIY Craft Tutorials
    Easter
    Faith Journey
    Fashion
    Father's Day
    Halloween/Autumn
    Ihanna’s Spring Swap DIY Art Postcards
    Interior Design
    Mental Health
    Mother's Day
    Music And Culture
    Parenting
    Poetry
    Ponderings
    Recipes
    Reflux Disease
    Valentine's Day

    RSS Feed

    Instagram
Powered by Create your own unique website with customizable templates.
  • Blog
  • Portfolio
    • Events
    • Writing
  • About Just Creative Julia
    • About Me
  • Links
  • Contact
Picture